How to Set Up a Ledger Wallet - Complete Step-by-Step Guide
Set up a new Ledger Nano, Flex or Stax correctly the first time - unboxing checks, PIN, the 24 words, genuine-device verification, and the first transfer test that catches mistakes before they cost you.
Setting up a Ledger takes about twenty minutes. Setting it up badly takes the same twenty minutes and you will not find out until the day you need the backup. This guide is the careful version: every step, why it exists, and the specific mistakes that turn a hardware wallet into an expensive USB stick.
Works for the Nano S Plus, Nano X, Flex and Stax - the flow is identical, only the buttons differ.
Step 1 - Check the box before you open it#
You are checking for a supply-chain tamper, which is rare but catastrophic.
- Where did it come from? Only the manufacturer's own store or an authorised reseller. Never Amazon Marketplace, never eBay, never a Reddit deal. Why buying matters.
- Is there a pre-filled recovery sheet in the box? If any card lists 24 words already written, stop. A genuine device generates your words on-device, at setup, in front of you. A pre-filled card means someone else holds your keys and is waiting for you to fund them.
- Is there a PIN in the box? Same answer. Stop.
- Any physical seal talk is a red herring. Ledger deliberately does not rely on holographic stickers, because stickers are trivially cloned. The real anti-tamper check is cryptographic, in step 5.
Step 2 - Install Ledger Live from the right place#
Type the manufacturer's URL by hand. Do not search for it - paid search ads for fake wallet software are a persistent, well-funded scam category, and the fake installers look perfect.
Install the desktop app (Windows, macOS, Linux) or the mobile app from your platform's official store, verifying the publisher name. Then follow our Ledger Live walkthrough if you want the tour.
Step 3 - Power on and choose "Set up as new device"#
Connect via the supplied USB-C cable. On a Nano you navigate with the two buttons: press either one to move, both together to confirm. On Flex or Stax you just tap.
Choose Set up as new device. The other option, Restore from recovery phrase, is only for moving an existing wallet onto this device - and it is the option scammers try to walk you into over the phone.
Step 4 - Set a PIN you will actually remember#
You choose 4 to 8 digits. Use 8.
The PIN protects against someone who physically holds your device. After three wrong attempts the device wipes itself, which is the feature that makes a short PIN survivable and a stolen device useless. It also means a curious child can factory-reset your wallet in ten seconds - at which point your 24 words are the only thing standing between you and total loss. That is the whole reason step 6 matters.
Step 5 - Write down the 24 words, on paper, by hand#
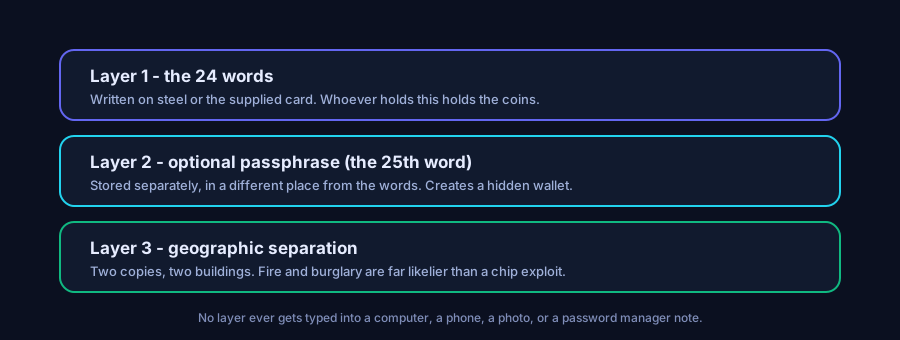
The device now displays 24 English words, one at a time, in order. This is the actual wallet. Everything else - the plastic, the chip, the app - is a replaceable accessory around these words.
- Write them on the supplied recovery sheets, in pencil or archival pen, in order, numbered.
- Write legibly.
cardandcordare both BIP39 words. So arefleeandflea. - The device will then ask you to confirm several of them. This is not busywork - it catches the transcription error you just made.
- Make a second copy and store it in a different building.
Never do any of the following, no matter how convenient:
- Photograph it. Phone photos sync to a cloud you do not control.
- Type it into a password manager, a notes app, an email draft, or a spreadsheet.
- Split it across two "safe" cloud accounts.
- Read it aloud near a smart speaker.
- Store the only copy in your home. House fires are far more common than hackers.
Step 6 - Let Ledger Live verify the device is genuine#
Back in Ledger Live, run the genuine check. The app challenges the secure element to prove, cryptographically, that it holds a key signed by the manufacturer at the factory. This is what a fake or tampered device cannot fake, and it is worth infinitely more than a sticker.
If it fails: stop, do not transfer funds, contact the vendor through a URL you typed yourself.
Step 7 - Install the coin apps you need#
Each blockchain needs its own small app on the device (Bitcoin, Ethereum, Solana...). Install them from the Ledger Live manager.
Storage is limited - a Nano S Plus holds around a hundred small apps, fewer if some are large. This does not matter as much as people fear: uninstalling a coin app does not delete anything. Your keys are derived from the 24 words, so removing and reinstalling an app leaves your balance untouched. Install what you need, remove what you do not.
Step 8 - Add accounts and receive a test amount#
Add an account per chain in Ledger Live, then hit Receive. Two things happen:
- Ledger Live shows an address.
- The device shows the same address. Compare them character by character - at minimum the first six and last six.
That comparison is the entire defence against clipboard-hijacking malware, which silently swaps a copied address for the attacker's. The computer can lie; the device screen cannot.
Now send a small test amount - ten or twenty dollars' worth. Wait for confirmation. Send a little back out. You have just proved the whole loop works before it matters. Full transfer guide.
Step 9 - The restore drill (the step everyone skips)#
Do this before you move real money, and do not skip it because it feels paranoid. It is the only test that proves your backup is correct.
- Reset the device: Settings → Device → Reset, or just enter the wrong PIN three times.
- Set it up again, this time choosing Restore from recovery phrase.
- Enter your 24 words from your written backup.
- Confirm the same accounts and the same balance reappear.
If the words were wrong, you now find out while the wallet holds twenty dollars instead of twenty thousand. There is no other way to know.
Step 10 - Optional: add a passphrase#
The 25th word turns your 24 words into a different wallet. It defends against someone who finds your written backup, and it gives you a plausible decoy wallet under coercion. It also adds a new way to lose everything: forget the passphrase and the funds are gone, with no recovery, ever.
Only add it once you have a rock-solid system for storing it separately from the words. Detail in the recovery phrase guide.
Your setup checklist#
| Done | Step |
|---|---|
| [ ] | Bought direct, box contained no pre-written words or PIN |
| [ ] | Ledger Live installed from a hand-typed URL |
| [ ] | Set up as new device, 8-digit PIN |
| [ ] | 24 words handwritten, in order, checked twice |
| [ ] | Second copy stored in a different building |
| [ ] | Genuine check passed |
| [ ] | Receive address verified on the device screen |
| [ ] | Small test in and out, confirmed |
| [ ] | Wiped and restored from the written backup successfully |
| [ ] | Funds moved across |
FAQ#
How long does it take to set up a Ledger wallet?#
About twenty minutes for the basic setup, plus another ten if you do the wipe-and-restore drill - which you should. Take longer than you think you need on the recovery phrase; it is the only irreversible part.
Do I need Ledger Live to use a Ledger wallet?#
No. Ledger Live is the easiest route and handles firmware updates, but the device also works with MetaMask, Rabby, Sparrow, Electrum and many other wallets. Most people use Ledger Live for updates and a third-party wallet for actual activity.
What happens if I lose my Ledger device?#
Nothing, provided you have your 24 words. Buy any compatible wallet, restore the phrase, and your funds are back - they were never on the device. Whoever finds the lost device faces a PIN that wipes it after three wrong guesses.
Can I use one Ledger for multiple people?#
You should not. One device, one recovery phrase, one owner. If two people need shared control, use a multisig setup with separate devices instead.
Should I write the recovery phrase on the card that came in the box?#
Yes for the first copy - that is what it is for. Then make a second copy, store it elsewhere, and move to a steel backup if the amount justifies it.
Disclosure. Some links on this site may be affiliate links. If you buy through them we may earn a commission at no extra cost to you. It never changes our verdict — we say when a product is a bad fit. Vaultwise is an independent publication. We are not affiliated with, endorsed by, or sponsored by Ledger SAS, Trezor/SatoshiLabs, or any wallet manufacturer. Product names and trademarks belong to their respective owners.
Keep reading
Ledger Live Guide - Download, Setup and Every Feature Explained
How to download Ledger Live safely, install coin apps, add accounts, send and receive, update firmware, and which built-in features are worth using versus which ones quietly cost you money.
Targets: ledger live download and setup
What Is a Hardware Wallet? Cold Storage Explained Simply
A plain-English explanation of hardware wallets - what they store, why cold storage beats a hot wallet, what a secure element does, and when you actually need one.
Targets: what is a hardware wallet
How to Transfer Crypto to a Ledger from Coinbase, Binance or Kraken
Move coins off an exchange and onto your Ledger safely - choosing the right network, verifying the address on the device, the test-transaction rule, and the mistakes that lose funds permanently.
Targets: how to transfer crypto from exchange to ledger
Get the self-custody checklist
One email a month: new scam patterns, firmware notes worth reading, and the mistakes that actually cost people money. No token shilling, ever.
Replace the form action with your own Formspree / ConvertKit / Buttondown endpoint in src/layout.mjs.